Select a Student
- Step 1 of Serving a Student: select the student. There are several ways to do this.
- Use a card scanner/key pad/or Biometrics scanner.
- Click/Touch the
 button to display the Name/Serving number/ID search grid.

- Add a Student to the Queue by:
- Enter the student’s Name/Serving Number/ID in the Search field (Touch Screen users will use the pop-up number pad).
- When searching by Name, you must select a student from the grid.
- Click a Student in the grid to add them to the queue.
- Enter the student’s Name/Serving Number/ID in the Search field (Touch Screen users will use the pop-up number pad).
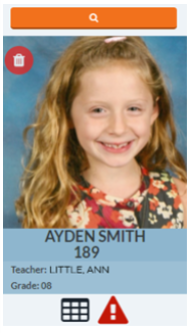
The student being served is displayed at the top of the queue, and their information will be displayed prominently with an icon for allergens, or special message, if any exist:

Student Icon Meanings 
Search Students. This is the button to click to manually search and add students to the Queue. 
Delete Student. This is the icon to click to delete a student from the Queue. 
Student Indicator. This is the symbol for a manually keyed-in Student. The Cashier can, via the keyboard, insert a student into the queue and that student will go to the top of the line. 
Queued Student Indicators. These are the symbols for a Queued Student (arrow indicates direction of device). The students will be added to the queue in the order they were inputted. 
Allergens Indicator. This is the icon to alert the cashier that the student has allergens and the cashier should review the Allergens box. 
Visiting Student Indicator. This is the icon to alert the cashier that the student is a visiting student. A student is considered a visitor if they are not assigned to the Primary site (serving site) you are logged in to or a secondary site that is associated with the serving site. 
Special Message Indicator. This is the icon to alert the cashier that the student has a special message and the cashier should review the Special Message box where any special messages are displayed (i.e. low salt diet, no extras, etc.).
Visiting Students
Point of Sale Serve Screen allows you to serve meals to any student in the district. Once the Visiting Student toggle is set to ‘ON’ , visiting students will display in the grid with the other students from the Serving Site.

Cashier Entry
- The cashier can select a Visiting students by Name or Serving Number or Student ID.
- When you enter a letter or number, the list automatically filters the matches available displayed in the grid based on that letter/number. This makes finding a student’s name quicker.
- Once a student name is selected, the serving screen appears and you can serve as you normally would.
Student Entry
- The student can enter their student ID (if known) in the ID text field instead of having the cashier look them up.
- Click the
 button to exit the Select a Student form and return to the POS Serve Screen.
 HOW DOES IT HANDLE ACCOUNT BALANCES FOR VISITING STUDENTS?
 HOW DOES IT HANDLE ACCOUNT BALANCES FOR VISITING STUDENTS?
A student is considered a visitor if they are not assigned to the Primary site (serving site) you are logged in to, or a secondary site that is associated with the serving site.
When a visitor transaction that affects charges or prepayments is entered, it will add two extra rows in history (PTRF) showing the charge/prepay amounts being transferred from the serving site to the home site. They will report only as account adjustments, and not affect Daily Deposit.
PTRFs do not show on the history screens since they do not affect the balance. To print a report of balance transfers, use the Charges and Prepayments Report and check Adjustments Only. If the transaction is voided, the PTRFs will be deleted.
©2021 EMS LINQ Inc.
Meals Plus Web Help, 10/2019